Science is not about memorizing thick textbooks or sitting through boring lectures. For your child, science is an adventure that begins the moment they ask why the sky is blue or how a plant drinks water. When you help them watch a reaction unfold right in your own kitchen, you are doing more than just playing. You are building a foundation of critical thinking.
Research in childhood cognitive development shows that active discovery helps children retain information far better than passive observation. By engaging their senses, you are helping them develop the habits of a lifelong scientist.
These thirty-five experiments turn your home into a safe, exciting lab. You do not need expensive equipment. Most of these projects rely on materials already sitting in your pantry or junk drawer.
The goal is to spark curiosity while showing your kids that science is woven into the very fabric of their everyday lives.
Safety and Guidance
Every great scientist knows that safety is the first priority. While these experiments use common household items, they still require a watchful eye. Please ensure you are present to help with mixing, handling sharp items, or using heat.
- Always keep a clean workspace.
- Never taste or ingest any materials unless they are standard food items.
- Keep a damp cloth or paper towels nearby for quick cleanups.
- Supervise all electrical work, such as battery connections, to prevent any sparks or short circuits.
Explaining the why behind these experiments is just as important as the doing. When a reaction occurs, ask your child what they expected to see. If it turns out differently, talk about why that might have happened. This turns a simple chore into a genuine learning moment.
1. Dancing Pepper Experiment
Items Required: Water, plate, black pepper, dish soap
How to Perform: Fill a plate with water and sprinkle a generous amount of black pepper across the surface. Take a small drop of liquid dish soap on your fingertip and gently touch the center of the water.
Science Behind It: You will see the pepper particles dash toward the edges of the plate instantly. This happens because dish soap reduces the surface tension of the water. Water molecules usually like to stick together, but the soap disrupts this attraction. The water molecules at the surface pull away to the sides, carrying the floating pepper with them.
2. Rainbow Milk Experiment
Items Required: Milk, food coloring, dish soap, cotton swab
How to Perform: Pour enough whole milk into a shallow dish to cover the bottom. Add a few small drops of different food colorings in the center. Dip a cotton swab into dish soap and touch the center of the milk.
Science Behind It: The colors will begin to swirl and dance on their own. Milk is made of water, fats, and proteins. When you introduce the soap, the fat molecules in the milk break down and move rapidly as they try to bond with the soap. This creates a visible flow that pushes the pigments around in beautiful, complex patterns.
3. Baking Soda Balloon Experiment
Items Required: Baking soda, vinegar, bottle, balloon
How to Perform: Fill a small plastic bottle with about two inches of white vinegar. Put two tablespoons of baking soda inside a deflated balloon using a small funnel. Carefully stretch the neck of the balloon over the bottle opening without letting the baking soda fall in just yet. Once it is secure, lift the balloon so the powder drops into the vinegar.
Science Behind It: You will see it fizz and bubble as the balloon inflates on its own. This is a classic acid-base reaction. The vinegar and baking soda create carbon dioxide gas, which has nowhere to go but up, effectively blowing up the balloon for you.
4. Homemade Lava Lamp
Items Required: Oil, water, food coloring, effervescent tablet
How to Perform: Fill a tall glass or bottle with water until it is one quarter full. Fill the rest with vegetable oil, leaving a little space at the top. Add several drops of food coloring, which will sink through the oil to the water layer. Drop half of an effervescent antacid tablet into the glass.
Science Behind It: The colored water bubbles will rise through the oil, pop, and sink back down. Oil and water refuse to mix because they have different densities and molecular polarities. The tablet creates carbon dioxide gas, which grabs onto the colored water and pulls it up through the oil. Once the gas escapes at the top, the heavier water drops back down.
5. Walking Water Experiment
Items Required: Cups, water, food coloring, paper towels
How to Perform: Line up three clear glasses. Fill the outer two with water and add a different color of food coloring to each. Leave the middle glass empty. Fold two paper towels into strips and place one end of each into the colored water, with the other ends resting in the middle empty glass.
Science Behind It: Over a few hours, you will see the colored water travel up the paper towel and drip into the center. This is called capillary action. Paper towels are made of fibers that act like tiny tubes, pulling water against the force of gravity through adhesion and cohesion.
6. Static Electricity Butterfly
Items Required: Tissue paper, balloon, string, scissors
How to Perform: Cut a simple butterfly shape out of thin tissue paper. Inflate a balloon and rub it vigorously against your hair or a wool sweater for about thirty seconds to build up a charge. Slowly bring the balloon close to the paper butterfly without letting them physically touch.
Science Behind It: You will see the butterfly wings lift and cling to the balloon. Rubbing the balloon against your hair causes an accumulation of negative static charge through friction. This charge creates an invisible electric field that attracts the lightweight paper, which has a neutral charge, effectively pulling it toward the balloon.
7. Lemon Battery
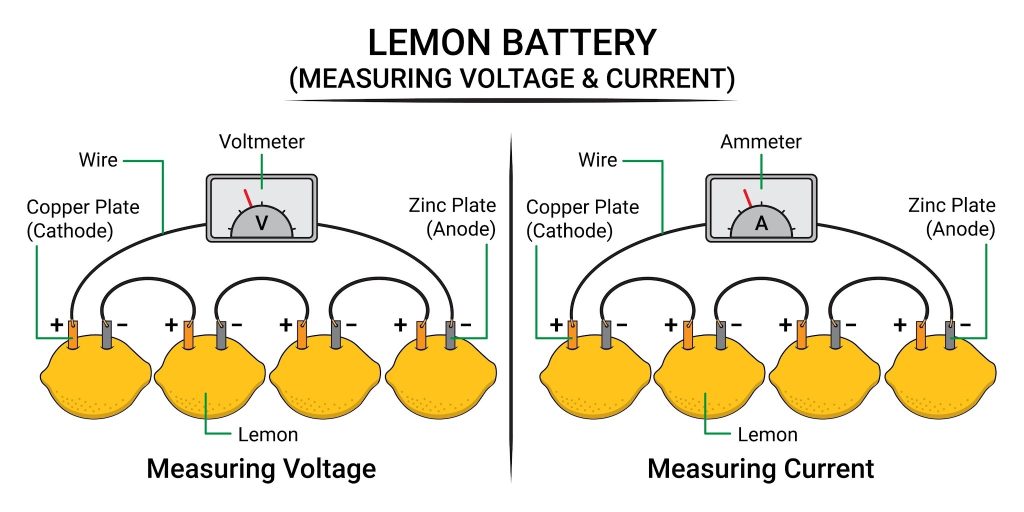
Items Required: Lemon, copper coin, zinc-coated nail, wires, LED light
How to Perform: Roll the lemon firmly on the table to release the juices inside. Make two small slits and insert the copper coin into one and the zinc-coated nail into the other. Connect a wire from the coin to one side of your LED and a wire from the nail to the other.
Science Behind It: The citric acid in the lemon acts as an electrolyte. This chemical environment allows electrons to flow from the zinc nail to the copper coin through the wire, creating a small electric current that is just enough to power a tiny LED bulb.
YouTube Video: Lemon Battery Science Project
8. Rubber Egg Experiment
Items Required: Raw egg, white vinegar, glass jar
How to Perform: Place a raw egg in a glass and cover it completely with white vinegar. Let it sit undisturbed for at least forty-eight hours. When you remove it, gently rinse it under cool water to remove the remnants of the shell.
Science Behind It: You are left with a translucent, bouncy egg. The vinegar is an acid that reacts with the calcium carbonate in the eggshell, dissolving it entirely. This leaves behind only the tough, semi-permeable membrane that normally protects the egg white and yolk, turning it into a flexible “rubber” ball.
YouTube Video: RUBBER EGG Easy Kids Science Experiments
9. Density Tower
Items Required: Honey, dish soap, water, vegetable oil, tall glass
How to Perform: Slowly pour your liquids into a clear glass in this specific order: honey, dish soap, water, and finally vegetable oil. Pour each one carefully down the inside wall of the glass to keep the layers distinct.
Science Behind It: You will see four clearly defined layers. This happens because each liquid has a different density, or mass per unit volume. The honey is the most dense, so it sits at the bottom, while the oil is the least dense, causing it to float on top of the water.
YouTube Video: 4 Layer Density Tower
10. Ice Salt Experiment
Items Required: Ice cubes, table salt, sugar, 3 small plates
How to Perform: Place three ice cubes of the same size on three plates. Sprinkle plain table salt on the first, sugar on the second, and leave the other as it is. Watch them closely for ten to fifteen minutes.
Science Behind It: You will notice the salt-covered cube melting significantly faster than the others. This occurs because of freezing point depression. Salt particles interfere with the ability of water molecules to stay in a crystal structure, which forces the ice to melt at a lower temperature than normal.
YouTube Video: The Science Behind Salt Melting Ice | Salt vs Sugar Test
11. Magnet Treasure Hunt
Items Required: Strong magnet, various household metal objects, tray
How to Perform: Scatter a mix of items on a tray, such as paper clips, coins, plastic toys, wood blocks, and iron nails. Ask your child to use the magnet to sort the items into two piles: “magnetic” and “non-magnetic.”
Science Behind It: This experiment identifies which materials are ferromagnetic. Magnets only attract materials that contain iron, nickel, or cobalt. Plastic, wood, and most coins (which are often copper or zinc) will stay put, demonstrating that not all metals react to magnetic fields.
YouTube Video: Is it magnetic or non-magnetic?
12. DIY Water Filter
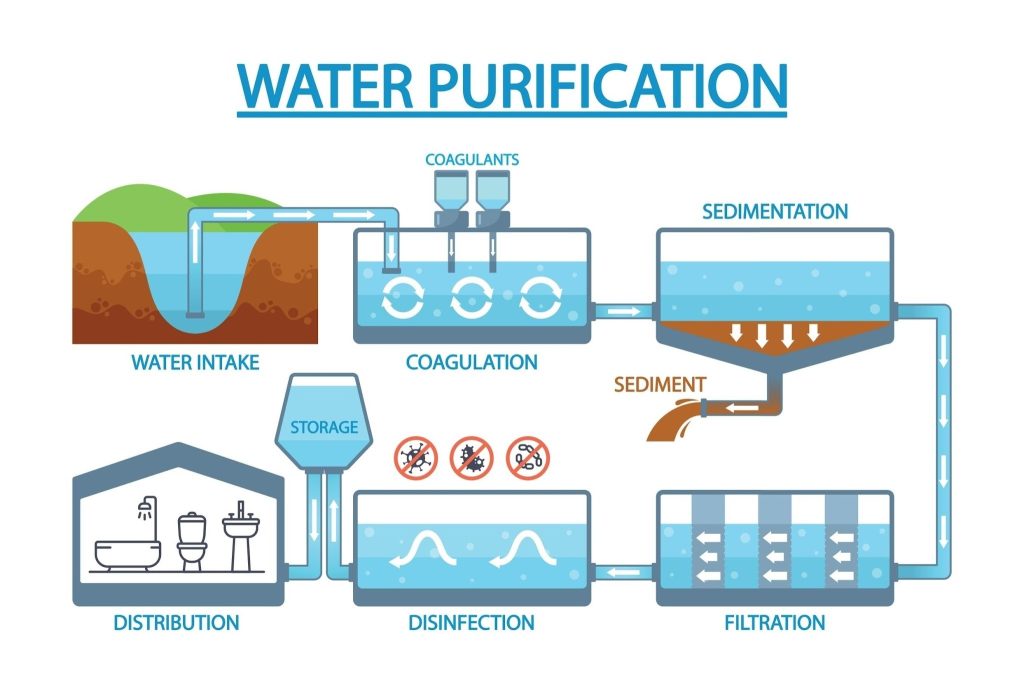
Items Required: Plastic bottle (cut in half), sand, small gravel, activated charcoal, coffee filter, dirty water
How to Perform: Place a coffee filter in the bottle neck. Layer the materials inside, starting with charcoal at the bottom, then sand, and gravel at the top. Slowly pour your “dirty” water (mix water with some soil) through the layers and catch the liquid in a clean glass.
Science Behind It: This is a lesson in physical filtration. The gravel catches larger debris like leaves or pebbles, the sand captures smaller suspended particles, and the activated charcoal absorbs certain impurities and toxins. While the water is clearer, remember that it is still not safe to drink!
YouTube Video: DIY water filter experiment
13. Homemade Compass
Items Required: Sewing needle, magnet, a small piece of cork or leaf, bowl of water
How to Perform: Rub the needle against your magnet about fifty times in one direction to magnetize it. Carefully push the needle through a small piece of cork or leaf, and gently place it on the surface of the water in a bowl.
Science Behind It: The needle will slowly rotate until it points toward the Earth’s magnetic North. You have turned the needle into a temporary magnet, which aligns itself with the Earth’s magnetic field. It is a simple way to visualize how early navigators used magnetism to cross oceans.
YouTube Video: How To Make A Compass With A Needle
14. Balloon Rocket
Items Required: Balloon, long piece of string, plastic straw, masking tape
How to Perform: Thread your string through the straw and tie the ends tightly between two chairs. Inflate the balloon but do not tie it. Tape the balloon to the straw, pull it back to the starting chair, and let go.
Science Behind It: This demonstrates Newton’s Third Law of Motion: for every action, there is an equal and opposite reaction. As the air rushes out of the back of the balloon (the action), it pushes the balloon forward in the opposite direction (the reaction).
YouTube Video: Balloon Rocket Science Experiment for Kids
15. Paper Bridge Test
Items Required: Several sheets of printer paper, books, coins
How to Perform: Place two stacks of books about six inches apart. Lay a flat sheet of paper across the gap and see how many coins it can hold before it collapses. Next, try folding the paper into an “accordion” (zig-zag) shape or a “C” channel and test the weight again.
Science Behind It: You will be shocked to find that changing the structural geometry of the paper makes it significantly stronger. Flat paper has no support, but folding it creates ridges and channels that distribute the load, showing how engineers design bridges and buildings to hold immense weight using simple shapes.
YouTube Video: Paper Bridges STEM Activity
16. Yeast Balloon Inflation Experiment
Items Required: Packet of dry yeast, sugar, warm water, plastic bottle, balloon
How to Perform: Fill the bottle with about one cup of warm water and stir in two tablespoons of sugar. Add the yeast, swirl it gently, and immediately stretch the balloon over the bottle opening. Set it in a warm spot and observe what happens over the next thirty minutes.
Science Behind It: You will see the balloon slowly inflate. Yeast is a living fungus that feeds on sugar. As the yeast consumes the sugar, it undergoes fermentation and releases carbon dioxide as a byproduct. Since the gas is trapped by the balloon, it has nowhere to go but up, inflating the balloon from the inside.
YouTube Video: Blow Up Balloon with Yeast
17. Homemade Butter Shake Experiment
Items Required: Heavy whipping cream, a small glass jar with a tight lid
How to Perform: Pour the cream into the jar until it is about half full. Secure the lid tightly and start shaking. You will need to shake it for five to ten minutes. At first, it will thicken into whipped cream, but if you keep going, you will eventually see the mixture separate into a solid chunk of butter and a watery liquid called buttermilk.
Science Behind It: Cream contains fat molecules held in place by membranes. Violent agitation breaks these membranes and forces the fat globules to clump together. As you continue to shake, these clumps merge into a solid mass of butterfat, leaving the liquid buttermilk behind.
YouTube Video: How to Make Butter in Jar
18. Salt Crystal Growth Experiment
Items Required: Table salt, hot water, a clean glass jar, a piece of string, a pencil
How to Perform: Stir as much salt as you can into hot water until it stops dissolving. This is called a saturated solution. Tie one end of the string to the pencil and rest the pencil across the top of the jar so the string hangs into the water. Leave the jar undisturbed for a few days.
Science Behind It: As the water slowly evaporates, it can no longer hold all the salt. The salt molecules begin to bond together, forming beautiful, geometric crystal lattices along the string. The slower the evaporation, the larger the crystals will grow.
YouTube Video: How to Grow Your Own Crystals at Home
19. Popcorn Expansion Science Test
Items Required: Popcorn kernels, a pan with a lid, stove
How to Perform: Place a few kernels in the pan and heat them over medium heat. Keep the lid on so the kernels stay inside. Listen for the sound of them popping.
Science Behind It: Every kernel contains a small drop of water stored inside a circle of soft starch. As the kernel heats up, the water turns into pressurized steam. The starch turns into a hot, gelatinous goop. Eventually, the pressure becomes too high for the outer shell to contain, and the kernel explodes inside out, instantly cooling and solidifying into the fluffy snack we love.
YouTube Video: Why Does Popcorn Pop?
20. DIY Sundial Experiment
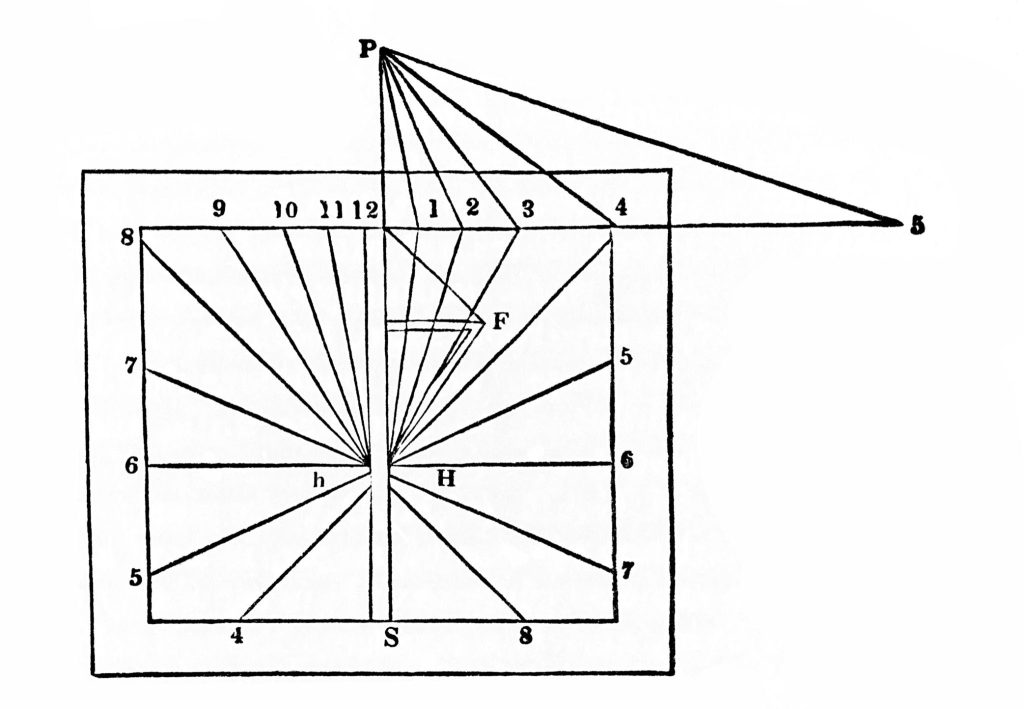
Items Required: A straight stick, a sunny spot in the yard, chalk or rocks
How to Perform: Push the stick vertically into the ground. Throughout the day, mark the tip of the stick’s shadow with a rock or chalk. Note how the shadow changes length and direction as the sun moves across the sky.
Science Behind It: This tracks the rotation of the Earth. Because the Earth spins on its axis, the sun appears to move across the sky, which changes the angle of the light hitting your stick. Your sundial is essentially measuring time by mapping the path of the sun relative to the rotation of our planet.
YouTube Video: Make a Sundial clock
21. DIY Electromagnet Experiment
Items Required: A large iron nail, about two feet of thin insulated copper wire, a D-cell battery, paper clips
How to Perform: Wrap the copper wire tightly around the nail in one direction, leaving a few inches of wire loose at both ends. Strip the insulation off the ends of the wire and tape them to the positive and negative ends of the battery. Once connected, touch the nail to the paper clips to see if it picks them up.
Science Behind It: You have just built an electromagnet. When an electric current flows through the wire, it creates a magnetic field around the nail, temporarily magnetizing it. When you disconnect one of the wires from the battery, the magnetic field disappears and the paper clips will drop.
YouTube Video: How to Make an Electromagnet
22. Floating Paper Clip Experiment
Items Required: A metal paper clip, a small square of tissue paper, a bowl of water
How to Perform: Fill the bowl with water. Gently place the tissue paper on the surface of the water, then carefully place the paper clip flat on top of the tissue. Use a pencil or toothpick to slowly poke the tissue paper until it sinks, leaving the paper clip floating on the surface.
Science Behind It: It seems impossible, but the paper clip is supported by surface tension. Water molecules are very cohesive and form a strong “skin” at the surface. As long as you don’t break that tension, the weight of the paper clip is distributed evenly, allowing it to rest on top of the water without sinking.
YouTube Video: HPL STEM Floating Paperclip
23. Invisible Ink Experiment
Items Required: Fresh lemon juice, a cotton swab, white paper, a heat source like a light bulb or electric iron
How to Perform: Dip the cotton swab into the lemon juice and write a hidden message on the paper. Let it dry completely until it becomes invisible. To reveal the secret message, hold the paper near a heat source for a few minutes.
Science Behind It: This is a lesson in oxidation. Lemon juice contains carbon compounds that are colorless when they are cold. However, these compounds are highly sensitive to heat. When you apply heat, the carbon compounds begin to oxidize and turn brown, revealing your message against the lighter paper.
YouTube Video: Lemon Juice Invisible Ink
24. Oil and Water Separation Test
Items Required: Vegetable oil, water, a transparent plastic bottle
How to Perform: Fill the bottle halfway with water, then fill the rest with oil. Screw the cap on tight and shake the bottle as hard as you can. Set it down on a table and wait for it to stop moving.
Science Behind It: Even though you mixed them, the liquids will quickly separate back into two distinct layers. This happens because water and oil have different molecular polarities. Water molecules are polar and like to stick to each other, while oil molecules are non-polar. Because they don’t share the same electrical properties, they literally refuse to mix.
YouTube Video: Emulsification Reaction | Water and Oil Experiment
25. Balloon Static Wall Experiment
Items Required: An inflated balloon, a wool or polyester cloth, a flat wall
How to Perform: Rub the balloon vigorously against the cloth to build up a static charge. Immediately press the balloon against the wall and let go.
Science Behind It: The balloon will stay stuck to the wall. The friction from the cloth transferred electrons to the balloon, giving it a static electric charge. This charge creates a temporary attraction between the balloon and the wall surface, defying gravity for a short time until the charge slowly dissipates into the air.
YouTube Video: Balloon on the wall – physics experiment
26. Homemade Barometer Experiment
Items Required: A small jar, a balloon, a plastic straw, tape, a piece of cardstock
How to Perform: Cut the neck off the balloon and stretch the remaining rubber tightly over the top of the jar. Secure it with a rubber band. Tape one end of the straw to the center of the balloon membrane, so the other end acts as a pointer. Place the cardstock behind the pointer to mark the movement.
Science Behind It: You have created a device that measures atmospheric pressure. When the air pressure outside the jar is high, it pushes down on the balloon, causing the straw pointer to move upward. When the pressure drops, the air inside the jar expands and pushes the balloon outward, causing the straw to move downward.
YouTube Video: Barometer | Easy Experiment to do at home
27. Solar Oven Experiment
Items Required: A cardboard box, aluminum foil, plastic wrap, a piece of chocolate
How to Perform: Line the inside of the box with aluminum foil to reflect sunlight. Place your piece of chocolate inside on a small tray. Cover the top of the box with plastic wrap to create an airtight seal and angle it toward direct sunlight.
Science Behind It: This simulates the greenhouse effect. The foil reflects solar radiation into the box, and the plastic wrap acts as a barrier that traps the resulting heat energy inside. As the temperature rises, the chocolate will melt much faster than it would sitting in the open air.
YouTube Video: How to Make Solar Oven
28. Rain Cloud Jar Experiment
Items Required: A glass jar, water, shaving cream, blue food coloring
How to Perform: Fill the jar three quarters full with water. Spray a large cloud of shaving cream on top. Carefully drip the blue food coloring into the shaving cream.
Science Behind It: As the food coloring settles into the shaving cream, it eventually becomes too heavy to stay suspended in the foam. It breaks through the cloud and falls into the water as droplets, simulating how precipitation occurs in the atmosphere when clouds become saturated with moisture.
YouTube Video: How to make a Rain cloud in a jar science experiment
29. Skittles Color Diffusion Experiment
Items Required: A pack of Skittles, a shallow plate, warm water
How to Perform: Arrange the Skittles in a circle around the edge of the plate. Carefully pour warm water into the center of the plate until it touches the candies. Wait a few moments to watch the colors move.
Science Behind It: You are witnessing diffusion. The sugar and artificial color on the candies begin to dissolve into the water. Because the concentration of color is highest right next to each candy, the pigments move away from the high concentration area toward the center of the plate where there is less color, creating a vibrant, rainbow effect.
YouTube Video: Skittles Rainbow Experiment for Kids
30. Candle Oxygen Experiment
Items Required: A small candle, a plate, water, a clear glass
How to Perform: Stick the candle to the center of the plate using a drop of melted wax. Fill the plate with about an inch of water. Light the candle and quickly cover it with the glass.
Science Behind It: The flame will eventually flicker and go out. As the fire consumes the oxygen inside the glass, the air pressure inside drops. The higher atmospheric pressure outside the glass pushes the water from the plate up into the glass to fill the space.
YouTube Video: Vacuum Candle Experiment
31. DIY Plastic Bag Parachute Experiment
Items Required: A light plastic grocery bag, string, scissors, a small toy or weight
How to Perform: Take your plastic grocery bag and flatten it out. To create the canopy, fold the bag into a square, then fold it into a triangle a few times until it forms a narrow wedge. Use your scissors to cut the top edge in a rounded arc. When you unfold the plastic, you will have a perfect circle. Cut several equal lengths of string. Tie one string to every section around the edge of your plastic circle. Gather all the loose ends of your strings together and securely tie them to your small toy or weight. When you drop it, the air catches the rounded canopy, creating a stable descent.
Science Behind It: This is a classic demonstration of air resistance and drag. As the parachute falls, the large surface area of the circular canopy pushes against the air molecules below it. By using a rounded shape and multiple suspension points, you create a more uniform distribution of pressure, which maximizes the upward force called drag. This force opposes gravity and slows down the descent of the toy, preventing it from hitting the ground at full speed.
YouTube Video: DIY Parachute with Plastic Bag
32. Homemade Thermometer Experiment
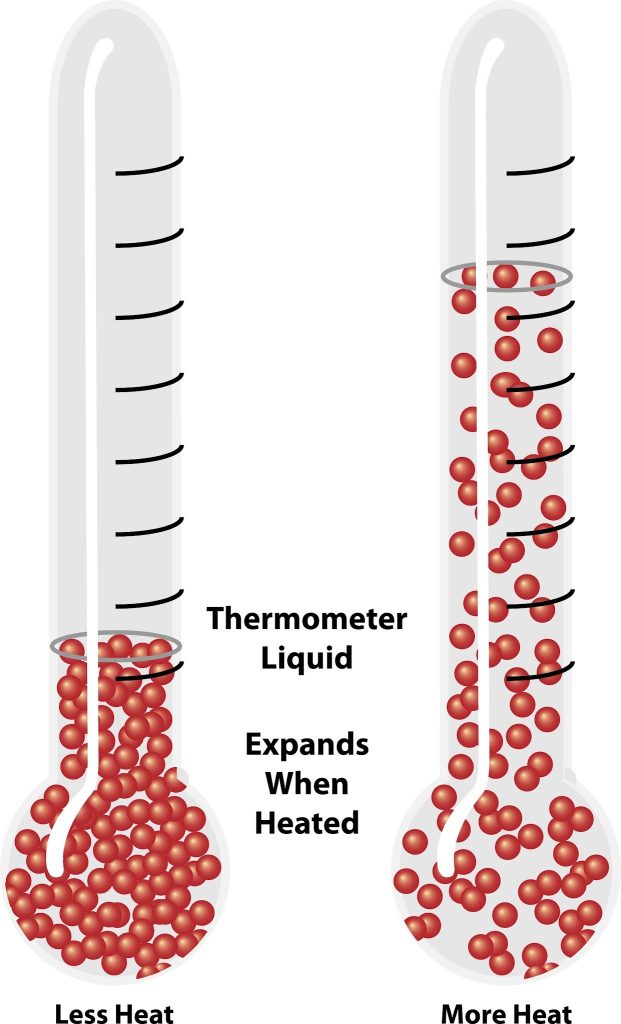
Items Required: A small plastic bottle, a clear plastic straw, modeling clay, colored water
How to Perform: Fill the bottle with water mixed with a few drops of food coloring. Insert the straw into the bottle, making sure it doesn’t touch the bottom, and seal the opening tightly with the clay so no air can get in or out. Place your hand around the bottle to warm it up and watch the water rise up the straw.
Science Behind It: This simple device works on the principle of thermal expansion. When you warm the water with your hands, the molecules gain energy and start to move faster, taking up more space and pushing the liquid upward into the narrow straw. When the water cools down, the molecules slow down and contract, causing the level in the straw to drop.
YouTube Video: How to make HOMEMADE THERMOMETER
33. Floating Orange Experiment
Items Required: One unpeeled orange, one peeled orange, a large bowl of water
How to Perform: Drop the unpeeled orange into the bowl of water and observe that it floats. Now, peel the second orange completely and drop it into the water. It will sink to the bottom.
Science Behind It: This experiment shows the power of buoyancy. Even though the orange looks heavy, the peel is full of tiny air pockets. These pockets act like a life jacket, making the unpeeled orange less dense than the water. Once you remove the protective peel, the fruit itself is denser than water, causing it to lose its buoyancy and sink.
YouTube Video: Buoyancy Experiment: Non-Peeled vs. Peeled Orange in Water
34. Matchstick Star Expansion Experiment
Items Required: Five wooden toothpicks, a shallow plate, a few drops of water
How to Perform: Break the toothpicks in half, but don’t snap them apart entirely—leave the wood fibers attached. Arrange them on the plate in a star shape. Carefully use a dropper to place a few drops of water into the very center where the matches meet.
Science Behind It: You will see the star slowly expand and open up. This happens because the dry wood fibers are highly absorbent. As the wood fibers soak up the water, they swell and expand, pushing the toothpicks outward and transforming the collapsed star into a perfect, open shape.
YouTube Video: Experiment with water and toothpicks
35. Seed Growth Comparison Experiment
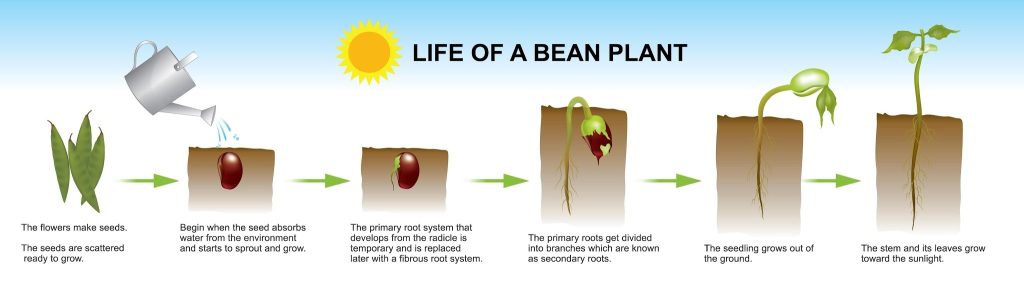
Items Required: Dried beans or seeds, three clear cups, paper towels, water, light
How to Perform: Line the inside of each cup with a damp paper towel and place a few seeds between the towel and the glass. Place the first cup in a sunny windowsill, the second in a dark closet, and the third in the refrigerator. Check them every day for a week and record the growth.
Science Behind It: Plants are sensitive to their environmental conditions. The seeds in the sun will likely sprout quickly because they have light for photosynthesis. The ones in the dark will grow, but likely look weak or pale. The ones in the fridge will show the slowest growth, demonstrating how temperature and light availability dictate the metabolic rate of living organisms.
YouTube Video: Plant VS Sunlight Experiment